Using the Sensors
From the modules web page select "Sensor set-up" to see the options page below.
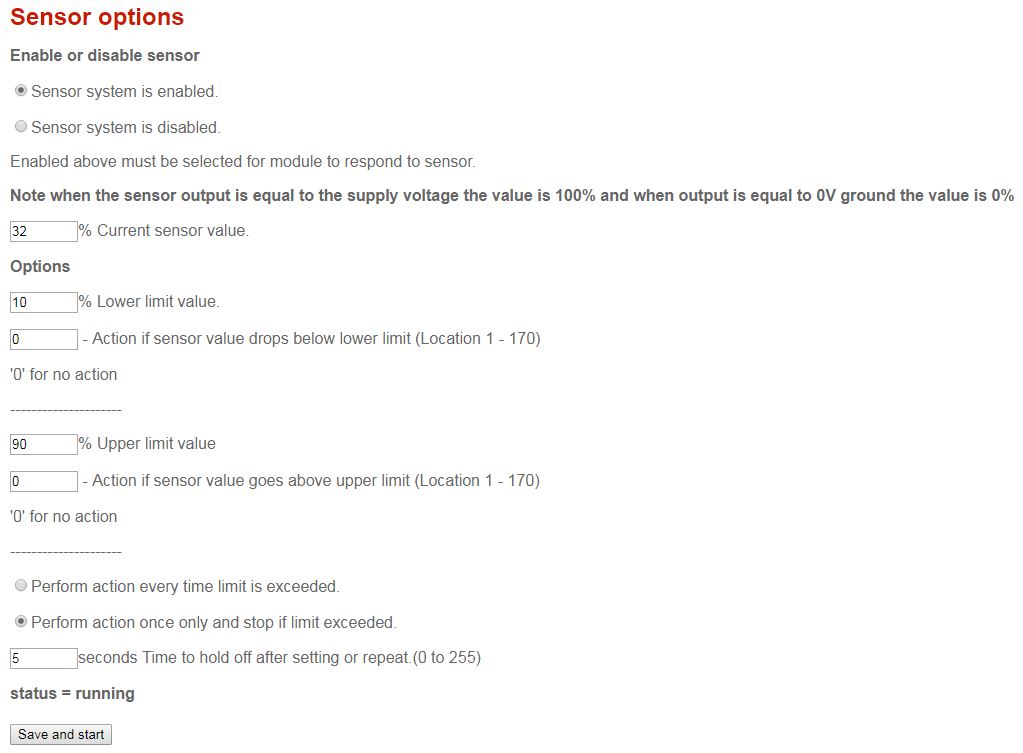
Enable or disable sensor
This is enabled by default. Should you wish to change this check the button and click on "save and start" at the bottom of the page.
Current sensor value
This box will provide a value between 0 and 100% as described in the sensor overview section.
Options
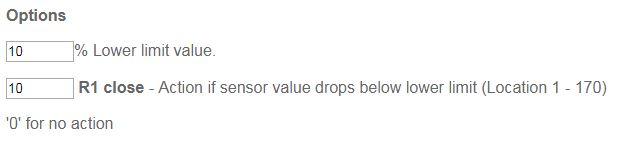
Here you can enter a two digit number for the lower limit value and a three digit number for the memory location to be triggered if the sensor reading falls below that value.
For example if you are using the light sensor you might wish some blinds or shutters to be closed when it gets dark. In this instance you would interface one of the relays to the shutter control switch. Next use the Utility program to store the command to close the relay (KCC R1CL for relay 1) in a spare memory location such as 11. Finally set the desired light level % eg 10 and enter number 11 as the action. Now whenever the sensor reading drops below 10% relay one will automatically close.
Similarly you can enter a % value and memory location for an upper limit. In the above example you would probably want the shutters to open again when the light reaches a certain level, so you could store the command to open the relay (KCC R1OP) in memory location 12. Set the upper desired light level eg 40% and enter number 12 for the action. Now whenever the sensor reading rises above 40% relay one will automatically open.
To assist you in the set-up the name you gave to the memory location will automatically appear when you enter the location number. In this example we have named button number 10 as R1 close.
In addition to control of the relays you can also store IR commands and http GET strings in the memory locations. Any of these can be triggered by the sensor levels so you can control AV equipment, air conditioning or send http strings to trigger actions on z-wave systems such as FIbaro, and also to trigger actions on the IFTTT (if this then that) website to generate emails and text messages. It is also possible to combine up to 20 memory locations into one single executable action by use of a "macro". This is explained in greater detail int the section on the Utility program.
Perform action every time or only once
Here you can choose if you want the actions in the memory locations to be triggered just the once or every time the set values are exceeded. If once only is selected the system will stop as soon as either the upper or lower limit is exceeded.
Time to hold off
Here you can enter a value between 0 and 255 seconds during which time the action will not be triggered. You would enter a delay here if the sensor you are using provides readings that fluctuate quickly or you need some time for the sensor to settle when activated.
Network Connection
Once the codes have been stored in the memory locations and sensor readings set then any self-contained actions will continue to function whether or not the network connection is maintained. In the light sensor/relay example above this could be configured, placed in another location and would continue to work without an etherent connection. The connection would of course be required to change the settings or if http strings were one of the required stored commands.