Connections & Indicators
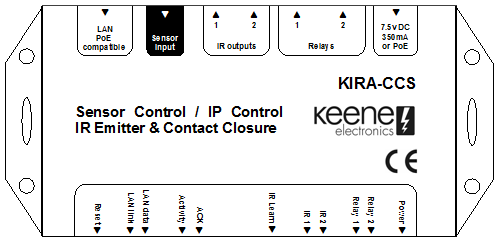
Reset Button
Pressing and holding the reset switch until the acknowledge light comes on will reboot the module whilst retaining all of the current settings. This switch can also be used to perform a full factory reset as detailed on the reset link opposite.
LAN link LED
Will illuminate to confirm that a network connection has been successfully established.
LAN data LED
Will flash whenever network data is sent or received.
Activity LED
Will flash whenever the module is executing a command.
Twice per second = looking for another module or computer on the network
Once every five seconds = found another module or computer on the network.
(see “advanced settings” for compatible computer information)
ACK - acknowledge LED
Will flash to confirm that data has been successfully transmitted to the target - in other words your message got there! (see "port forwarding" for more details)
IR Learn Window
Aim your remote control at this when learning codes for storage.
IR1 & IR2 Activity LED's
Will flash whenever IR data is sent to that IR emitter port.
Relay1 & Relay2 Activity LED's
Will illuminate whenever the contacts are closed.
Power LED
Should always be illuminated whenever power is connected. Don't expect much to happen if it's not.
LAN PoE compatible
Use a CAT5/E/6 cable to connect this port to your hub, switch or router. This should not be connected directly to your computer network port. If you can't run a network cable to the desired location you can optionally connect to your home network using either a pair of plug-in powerline adapters or a wireless Ethernet Bridge. If connected to a PoE (power over Ethernet) compatible hub then no external power supply will be required.
Sensor Input
3.5mm Jack socket to connect to a Keene Sensor. Please refer to the section heading on Sensors for more detailed information.
IR Output 1 & IR Output 2
To be connected to IR emitter wands or to the input of an IR distribution system. Optionally send commands to both outputs simultaneous or route to output 1 or output 2 as required. Supplied as standard with close range emitter wands, other options are available as listed under "Accessories". Connect an IR emitter to the module and position it so that the output points towards the IR receiver window of the device you wish to control. The emitter will need to be close to the IR receiver window to ensure reliable operation, ideally within 15cm. If you are not sure exactly where the IR receiver window is you can experiment by cutting a small circle in a piece of card and holding it in front of the device whilst you operate the remote control. As you move the card along you should be able to find the area that gives best results and then make sure that the IR emitter from the KIRA is positioned accordingly. If you wish to control more than one device you can connect the output from the KIRA module into another IR distribution amplifier (such as the IRBKIT) and use the multiple outputs to control several devices.
Relay 1 & Relay 2
The green connectors can be unplugged by simply pulling away from the unit for ease of installation. The contacts are rated at 48V 6A and can be commanded to open, close or pulse as required. The Pulse time can be set in 1/4 second intervals up to 1 minute. Pulse will invert current state for the time required. They can be configured to start up as open (N.O.), closed (N.C.) and optionally with a start-up time delay if required.
Power
If a PoE (Power over Ethernet) connection is used then no other power supply is required. If a power supply is to be used it should be rated at a minimum of 7v and maximum of 9v DC (regulated) at 200mA or greater, 2.1mm DC socket, centre positive.