To use a Kira module as an IR sensor
This integration allows you to use specific buttons on an IR remote control to trigger actions or scenes within Home Assistant.
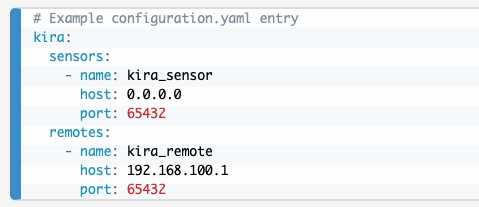
Step 1 - Edit your configuration.yaml
Add this section:
kira:
sensors:
- name: kira_sensor //(call it whatever you like)
host: 0.0.0.0 (always use this and NOT your actual module IP)
port: 65432 //(can be changed on the kira module - 65432 is factory default)
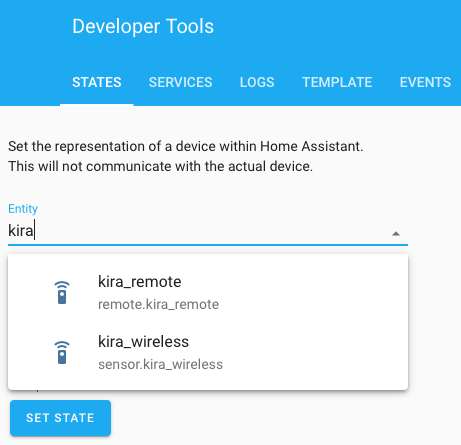
Step 2 - Restart your Home Assistant server
You should now have an entity called kira_sensor (or whatever you called it). To check go to Developer Tools > States and start to type “kira” (or whatever you called it) within the entity list. If all is well you should see kira_ appear. As long as it appears there you are OK at this point.
Step 3 - Obtain the infrared code(s)
Now capture the infrared codes that you wish to use to trigger the automations. There are several possible ways of doing this but the easiest is to use the kira utility (see menu link above).
Launch the utilty, cick “learn” and aim your remote at the receiver. Press the button you want to capture. You should see a string of code appear in the code window beginning with the letter “k”. Copy this string of code.
Step 4 - Edit your kira.yaml
Go to Configurator and edit your kira.yaml file to make an entry for the code. As an example this is an entry for the number 1 button from a Panasonic DVD player:
- name: PanaOne
code: “K 2432 0D31 06EB 0196 01F3 0194 0538 01B4 01D3 01B4 01D1 01B4 01D3 01B4 01D3 01B3 01D3 01B3 01D3 01B4 01D3 01B3 01D3 01B3 01D3 01B4 01D3 01B3 01D3 01B4 0518 01B4 01D3 01B3 01D3 01B4 01D1 01B7 01D1 01B7 01D1 01B4 01D3 01B4 0518 01B4 01D3 01B4 01D1 01B7 0518 01B4 01D3 01B3 01D3 01B4 01D1 01B7 01D1 01B4 01D3 01B4 01D1 01B7 01D1 01B7 01D1 01B4 01D3 01B4 01D1 01B7 01D1 01B4 01D3 01B4 0518 01B4 01D3 01B4 01D1 01B7 01D1 01B7 01D1 01B4 01D3 01B4 01D1 01B7 01D1 01B4 01D3 01B4 01D1 01B7 01D1 01B4 0518 01B7 2000"
device: DVD
type: kira
Step 5 - Restart your Home Assistant server
Each time you edit and save the kira.yaml you need to restart the HomeAssistant server for the changes to take effect, reloading the automations alone is not sufficient.
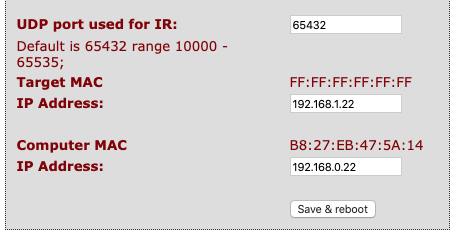
Step 6 - Configure the Kira module
Now visit the Kira module configuration page and be sure to make the following changes according to your module use:
If this is to be the only use of the Kira module then set the TARGET IP address to be that of your Home Assistant installation.
Uncheck the “auto find” option box if present
.
Click on save and reboot to make the changes effective.
- - - - - - - - -
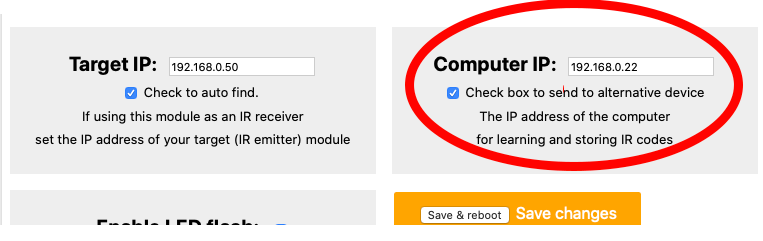
If the Kira module is to used in conjunction with another module be for IR over IP then leave (or set) the TARGET IP address to that of the other Kira module and in this instance set the COMPUTER IP address to the IP address of your Home Assistant installation.
Check the option box to "send to alternative device" if present.
Click on save and reboot to make the changes effective.
Note that once you changed the COMPUTER IP you will longer be able to use the Kira utiltiy on your PC to capture IR codes.
Step 7 - Test the sensor
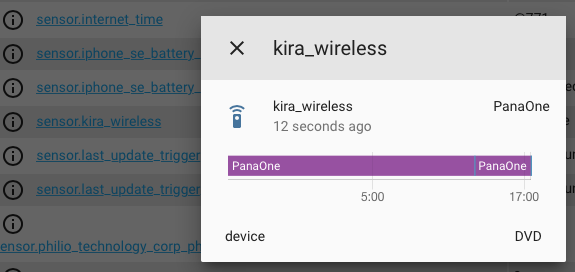
Next within HomeAssistant go to Developer tools > states and scroll down the list until you see sensor.kira_(whatever you called it). Aim your remote at the kira and press the buttons you stored the code for. If all is well you should see the state change to match the name you gave to the code.
Excellent! Now you can use your remote control to trigger any action you like within Home Assistant.
Step 8 - Create the automation
As an example, this entry in automations yaml uses the Panasonic remote control buttons One and Two to turn a sonoff plug on or off:
- id: '1583339338363'
alias: Panasonic On
description: Turn on sonoff s20 relay
trigger:
- entity_id: sensor.kira_wireless
platform: state
to: PanaOne
condition: []
action:
- device_id: 3628b4f34df943b3b721ead954cf3ca7
domain: switch
entity_id: switch.plug2_relay
type: turn_on
- id: '1584035716024'
alias: 'Panaxonic Off '
description: Turn off sonoff s20 relay
trigger:
- entity_id: sensor.kira_wireless
platform: state
to: PanaTwo
condition: []
action:
- device_id: 3628b4f34df943b3b721ead954cf3ca7
domain: switch
entity_id: switch.plug2_relay
type: turn_off
Once you are happy that the sensor is working we suggest that you frequent the Home Assistant community for ideas and examples of how best to make use of the integration.