Advanced Options
The "Routing & Repeats" button will have no effect on a KiraGET module as it has no routable outputs, this is only for use with the IR Commander Matrix and KIRACC Modules.
In the Options menu (drop down) you also have some extra IR learning options:
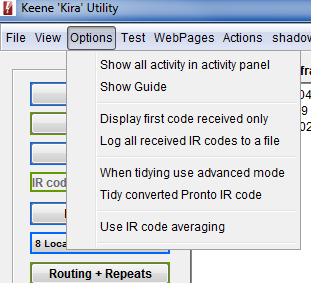
Display first code received only (optional, default = OFF)
Will stop detecting IR code after the first complete string is received. Some brands, JVC for example, send a "button held" string immediately after the original command has been sent. When capturing it can sometimes be difficult to avoid capturing the button held command rather than the first burst of data containing the actual instruction you were after. Checking this option tells the module to stop as soon as the first valid string has been captured.
Log all received IR codes to a file (optional, default = OFF)
A one second press of an IR remote button usually results in the same string of code being emitted many times over.
If the “log all codes” button is not checked then the IR Anywhere module will automatically stop capturing once the last full string of code has been received and the captured code will be displayed in the code window
If the “log all codes” button is checked then every received string will be written to a text file. This can sometimes be useful as you can easily see any variations and can choose the “best” captured string as the one to use. To do this simply cut and paste the desired code into the code window and then save as normal. The received code count will increment with each successfully captured string.
Note: the log file is not written to until the “learn” button is clicked again to end the capturing process. The file location can be set using the main menu option "File>Set load and save directory".
When tidying use advanced tidy (optional, default = OFF)
This option looks at the code and re-arranges it to comply with the nearest complete cycle based on the carrier frequency.
Tidy converted Pronto Code (optional, default = OFF)
There are a number of IR codes available on the internet for use with the Pronto range of remote controls. You can paste the raw Pronto code into the text box and click "convert from Pronto". This will then have the same net effect as if you had captured the code from your own remote control. Checking the "tidy converted Pronto code" will attempt to average the code in the same way that the "tidy code" button works during actual capture.
Use Code Averaging (optional, default = OFF)
Check this box to have the software attempt to remove any unwanted noise from the IR signal performing an average over twenty captured codes. It’s not foolproof as some remotes don’t repeat the whole string every time, but if you’re having trouble capturing a clean usable code it’s worth a try.
~
Infrared Code window (main program panel)
This area shows a simple ASCII text representation of the IR code. The first character in the string is a capital "K" followed by a space. The next four characters are the frequency expressed as a 2 digit hex number and number of bursts of carrier including the lead in burst followed by a space.
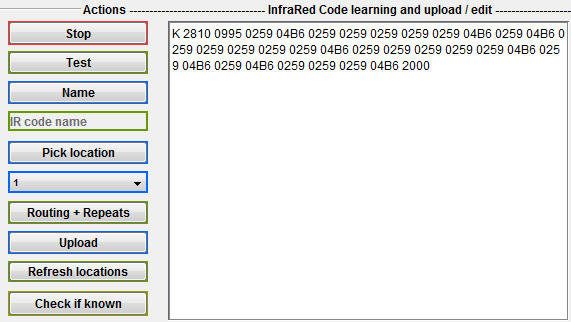
The remaining blocks of four ASCII characters are the times in uS in hex of the burst then no burst. All are separated by a space.
The final value is always 2000 and is the lead out no-burst time.
An example here is a 12 bit Sony code
K 280D 097A 0253 0272 0241 04C9 0240 0273 0241 0272 0240 04CA 0241 0273 0241 0271 0242 04C9 0241 0272 0240 0273 0240 0273 0240 0273 2000
28 = decimal 40 = carrier frequency for Sony
0D = 13 = 12 bit data plus 1 for the lead in burst pair
The rest are times in uS
097A = decimal 2426 = 2426uS lead in burst of carrier
0253 = decimal 595 = 595 lead in no carrier or space time.
etc till end of string
Ignoring the K 280D there should be 0D x 2 blocks of four digits
To store the code as a string in an IRAnywhere product we have to give it a name. This name is added to the front of the string as follows
#S_TV_Vl_Up:K 280D 097A 0253 0272 0241 04C9 0240 0273 0241 0272 0240 04CA 0241 0273 0241 0271 0242 04C9 0241 0272 0240 0273 0240 0273 0240 0273 2000
A # identifies it as a code to be stored and the : indicates the end of the name
The name can be a maximum of 15 characters in length.
Learning IR Tips
The IR receiver in the KiraGET module is designed to work best at the sort of distances you would use normally a remote control, typically between about 2 and 5 metres. Consequently, to get the best results when learning, the remote should be positioned between 2 and 5 metres from the IRAnywhere receiver module. If you are sitting next to the module try bouncing the remote signal off the ceiling. i.e. point the remote control upwards.
Try to perform the learning away from other strong sources of IR such as direct sunlight or bright fluorescent lighting.
The timings for remote controls are quite lax and 2 remote controls controlling the same device will often vary in the figures produced. These figures can be as much as 10% out and still work in most cases. If learning a complete remote control it is a good idea to spend a few minutes just getting familiar with the IR code produced. Turn on code logging, start learning - press a couple of buttons for about 3 seconds each - stop the learning Look at the log file with notepad or similar text viewer. It is easy to see the general format of the code produced and to spot any short or malformed codes.
For some IR codes the code length will be the same regardless of which button is pressed while for others the length will change from one button to another (UK SKY is an example of this).